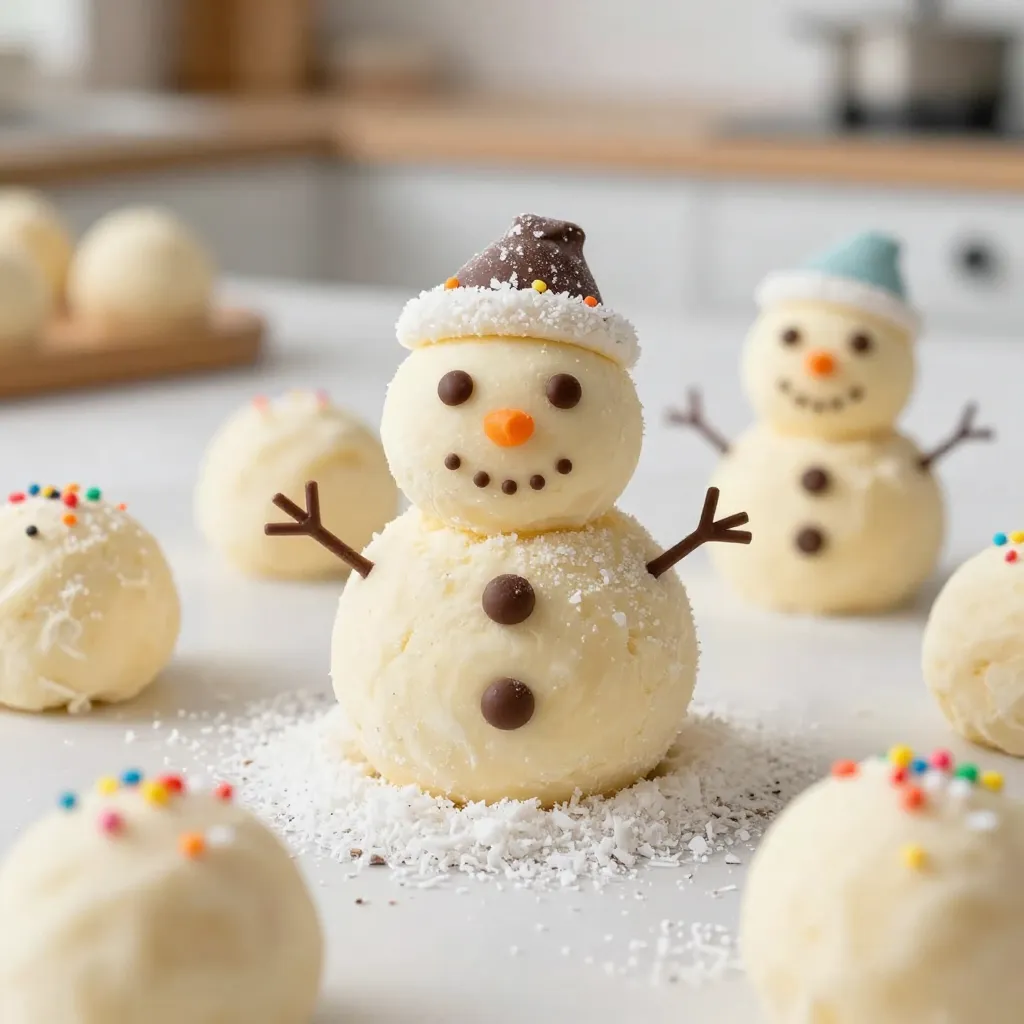
Get ready for a fun holiday treat that’s both easy and delicious: No-Bake Snowman Truffles! These cute little snowmen are perfect for parties or cozy nights at home. Made with simple ingredients like cream cheese and white chocolate, even kids can help. In this post, I’ll guide you through the steps to create these tasty delights. Let’s dive in and make your holiday celebrations a bit sweeter!
Why I Love This Recipe
- Fun for All Ages: These no-bake snowman truffles are a delightful treat that kids and adults alike can enjoy making together, creating lasting holiday memories.
- Easy Preparation: With just a few simple ingredients and no baking required, this recipe is quick to whip up, making it perfect for last-minute holiday gatherings.
- Customizable Decorations: Get creative with the toppings! Use different candies and sprinkles to personalize each snowman, allowing for a fun and unique presentation.
- Deliciously Sweet: The combination of cream cheese, white chocolate, and vanilla wafers creates a rich and satisfying flavor that will have everyone coming back for more.
Ingredients
Main Ingredients
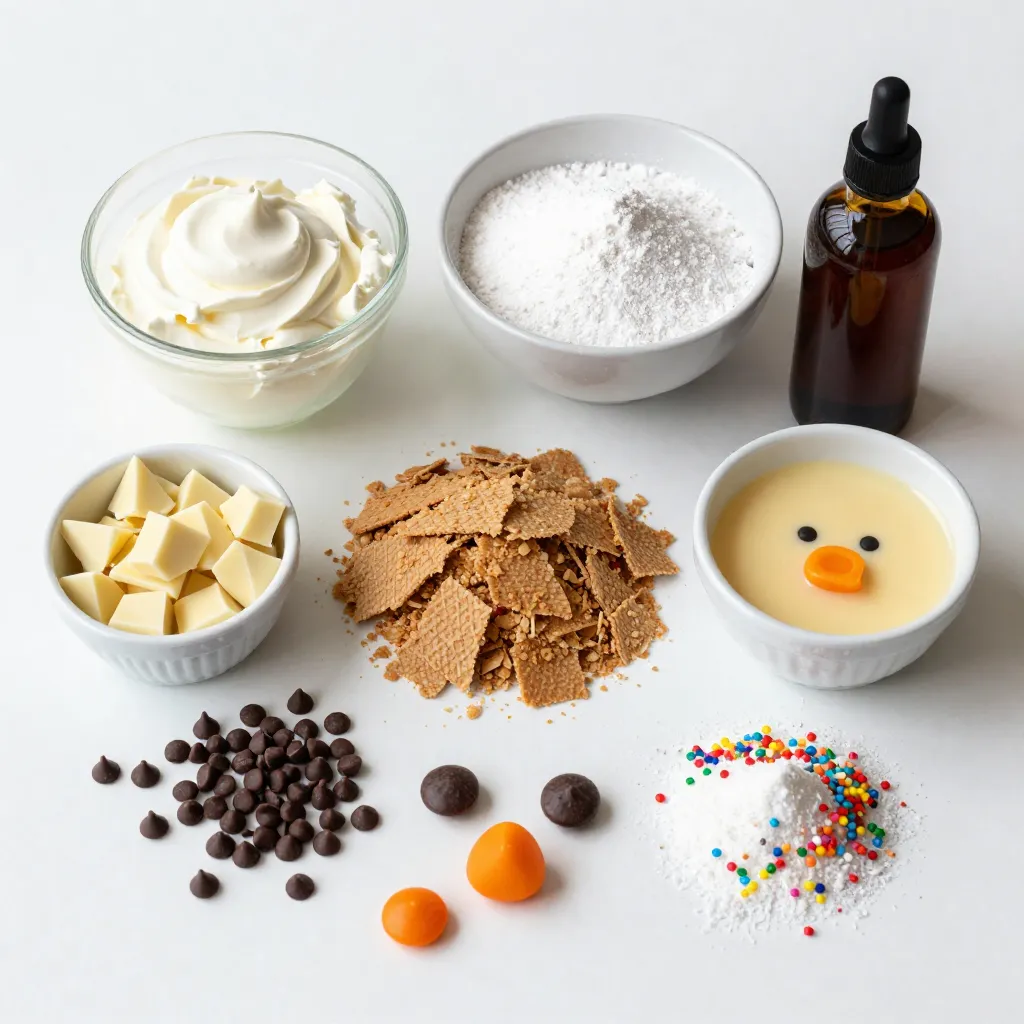
– 1 cup cream cheese, softened
– 1 cup powdered sugar
– 1 ½ cups crushed vanilla wafers
– 1 cup white chocolate chips, melted
– ½ teaspoon vanilla extract
Decorative Ingredients
– Mini chocolate chips
– Orange candy or fondant
– Sprinkles
– Coconut flakes
Measurement Details
– Use 1 cup of cream cheese for a rich base.
– Add 1 cup of powdered sugar for sweetness.
– Crush 1 ½ cups of vanilla wafers for texture.
– Melt 1 cup of white chocolate chips for coating.
– Mix in ½ teaspoon of vanilla extract for flavor.
– Use mini chocolate chips for eyes and buttons.
– Cut small pieces of orange candy or fondant for noses.
– Use sprinkles to create fun hats.
– Add coconut flakes for a snowy look.
Step-by-Step Instructions
Preparation of the Truffle Mixture
Start by mixing the cream cheese and powdered sugar in a large bowl. Beat them until the mixture is smooth and creamy. This step is key for a rich and tasty truffle. Next, add the crushed vanilla wafers and melted white chocolate. Mix in ½ teaspoon of vanilla extract for extra flavor. Blend everything well until you have a thick mixture that holds together nicely.
Forming the Snowman Truffles
Now comes the fun part! Use your hands to roll the mixture into small balls. Aim for about 1 inch in diameter. Place the rolled balls on a parchment-lined baking sheet. This will keep them from sticking. After that, chill them in the fridge for 30 minutes. This helps them firm up. Once they are firm, take two truffles. Stack one on top of the other. This creates the snowman shape you want.
Adding Finishing Touches
For the finishing touches, use mini chocolate chips for the eyes and buttons. Press them gently into the top truffle. Next, cut small pieces of orange candy or fondant to make noses. Attach the noses just below the eyes. It adds character! Finally, sprinkle coconut flakes around the bottom of the truffles. This gives a lovely snow effect. You can also add sprinkles on top for festive hats. Your snowman truffles are now ready to impress!
Tips & Tricks
Perfecting the Texture
To get the right texture for your snowman truffles, start with softened cream cheese. It should feel smooth and creamy after mixing. If it feels too stiff, you may need to beat it longer. Mix in the powdered sugar slowly. This helps avoid lumps. When adding crushed vanilla wafers and melted white chocolate, mix until fully combined. The mixture should be sticky but moldable for rolling.
When rolling truffles, keep your hands slightly wet. This helps prevent sticking. Aim for small balls about 1 inch wide. If they are too big, they won’t stack well for your snowman. After rolling, place them on parchment paper to chill.
Time-Saving Strategies
Prep your ingredients before you start. Measure out your cream cheese, powdered sugar, and crushed wafers. This saves time as you mix. You can also melt the white chocolate beforehand. If everything is ready, you can make the truffles in no time.
For assembly, work in batches. Roll all the truffles first, then stack them. This way, you keep your workspace clear and organized.
Presentation Tips
For a fun presentation, place the truffles on a festive platter. You can use a snowy tablecloth or a simple white plate for contrast. Around your truffles, sprinkle coconut flakes to mimic snow.
Get creative with decorations! Use mini chocolate chips for eyes and buttons. Cut orange candy for noses and place them carefully. Add sprinkles on top for a festive hat. The more colorful, the better!
Pro Tips
- Chill for Better Texture: Ensure your cream cheese is well-softened for easy mixing. After rolling the truffles, refrigerate them longer for a firmer texture, making them easier to stack.
- Customize Your Snowman: Get creative with decorations! Use different colored candies or sprinkles to give each snowman a unique personality.
- Perfectly Melted Chocolate: When melting white chocolate, do it slowly in short bursts in the microwave or over a double boiler to prevent burning.
- Store Properly: Keep your snowman truffles in an airtight container in the refrigerator for up to a week to maintain freshness.
Variations
Flavor Customization
You can change the flavor of your No-Bake Snowman Truffles. Try adding different extracts. Almond extract adds a nice nutty taste. Peppermint extract gives a holiday twist. You can also swap in flavored wafers for a unique touch. For example, use chocolate wafers instead of vanilla. This will change the snowman’s flavor while keeping it fun.
Different Decorations
Decorations can change with the seasons. Use colored sprinkles for birthdays or holidays. You can also add small candies for hats or scarves. Try using mini gummy candies for a fun look. If you want a winter theme, stick with white and blue sprinkles. You can even design snowmen to match a party theme.
Dietary Modifications
You can make these truffles gluten-free easily. Just use gluten-free vanilla wafers. For vegans, choose dairy-free cream cheese and chocolate. Make sure to check labels for hidden dairy or gluten. This way, everyone can enjoy the delicious snowmen!
Storage Info
Storing Truffles
To keep your snowman truffles fresh, store them in the fridge. Place them in an airtight container. This helps prevent drying out. You can also line the container with parchment paper. This will help keep the truffles from sticking together.
Shelf Life
Snowman truffles last about 1 week in the fridge. If you want to keep them longer, consider freezing. Wrap each truffle in plastic wrap before placing them in a freezer-safe bag. This protects them from freezer burn.
Serving Recommendations
When you take the truffles from the fridge, let them sit for about 10 minutes. This makes them easier to eat. If frozen, thaw them in the fridge overnight. Never thaw them at room temperature, as this can change their texture.
FAQs
Can I make No-Bake Snowman Truffles in advance?
Yes, you can make No-Bake Snowman Truffles ahead of time. I often prepare them one or two days before a party. Just follow these steps for easy storage:
– After making the truffles, place them on a parchment-lined baking sheet.
– Cover the sheet tightly with plastic wrap.
– Store them in the fridge until you are ready to serve.
This method keeps them fresh and tasty. If you need to store them longer, you can freeze them. Just remember to let them thaw in the fridge before serving.
What can I use instead of white chocolate?
If you want to swap out white chocolate, there are several options. Here are some ideas:
– Use vanilla-flavored almond bark. It melts well and tastes great.
– Try yogurt-covered pretzels for a fun twist.
– Melted butterscotch chips can add a sweet flavor.
These substitutes keep the truffles fun and tasty. Experiment and find what you like best!
How do I make a dairy-free version?
Making dairy-free No-Bake Snowman Truffles is easy. Here are my tips:
– Use dairy-free cream cheese instead of regular cream cheese.
– Choose powdered sugar that is labeled dairy-free.
– For the white chocolate, look for dairy-free chocolate chips.
These swaps create a delicious treat for everyone to enjoy. You can still have fun decorating and sharing these treats!
You now have all the tools to create No-Bake Snowman Truffles. We’ve covered the main ingredients, preparation steps, and lots of fun decoration ideas. Don’t forget the tips for perfect texture and time-saving tricks. You can even customize flavors and accommodate different diets.
These truffles are not just tasty; they also make a great treat for kids and guests. I hope you enjoy making and sharing these delightful snowmen. Happy trufflin