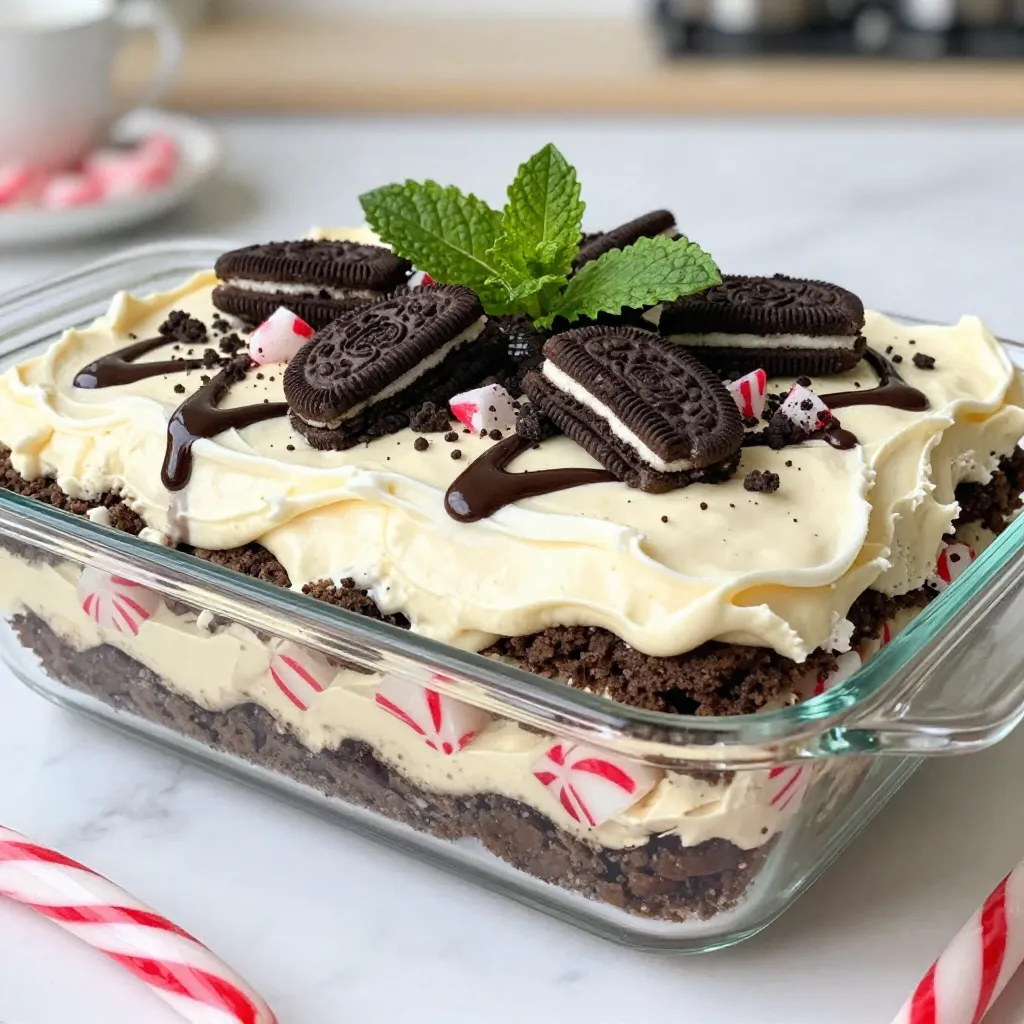
Get ready to impress your family with the ultimate festive treat: No-Bake Christmas Oreo Lasagna! This easy holiday dessert combines layers of creamy goodness, crushed Oreos, and a hint of peppermint. Perfect for any holiday gathering, this recipe is quick to prepare and no baking is required! Follow along as I share the simple steps to create this delightful lasagna that will have everyone asking for seconds.
Why I Love This Recipe
- Decadent Layers: This recipe features luscious layers of cream cheese, vanilla pudding, and whipped topping, making every bite a delightful treat.
- No Baking Required: Perfect for busy holiday seasons, this no-bake dessert saves time while delivering a deliciously impressive dish.
- Festive Flavor: The addition of crushed peppermint candy canes gives this lasagna a cheerful holiday touch that everyone will love.
- Easy to Assemble: With simple steps and easy-to-find ingredients, you can whip up this dessert quickly and make it a holiday favorite.
Ingredients
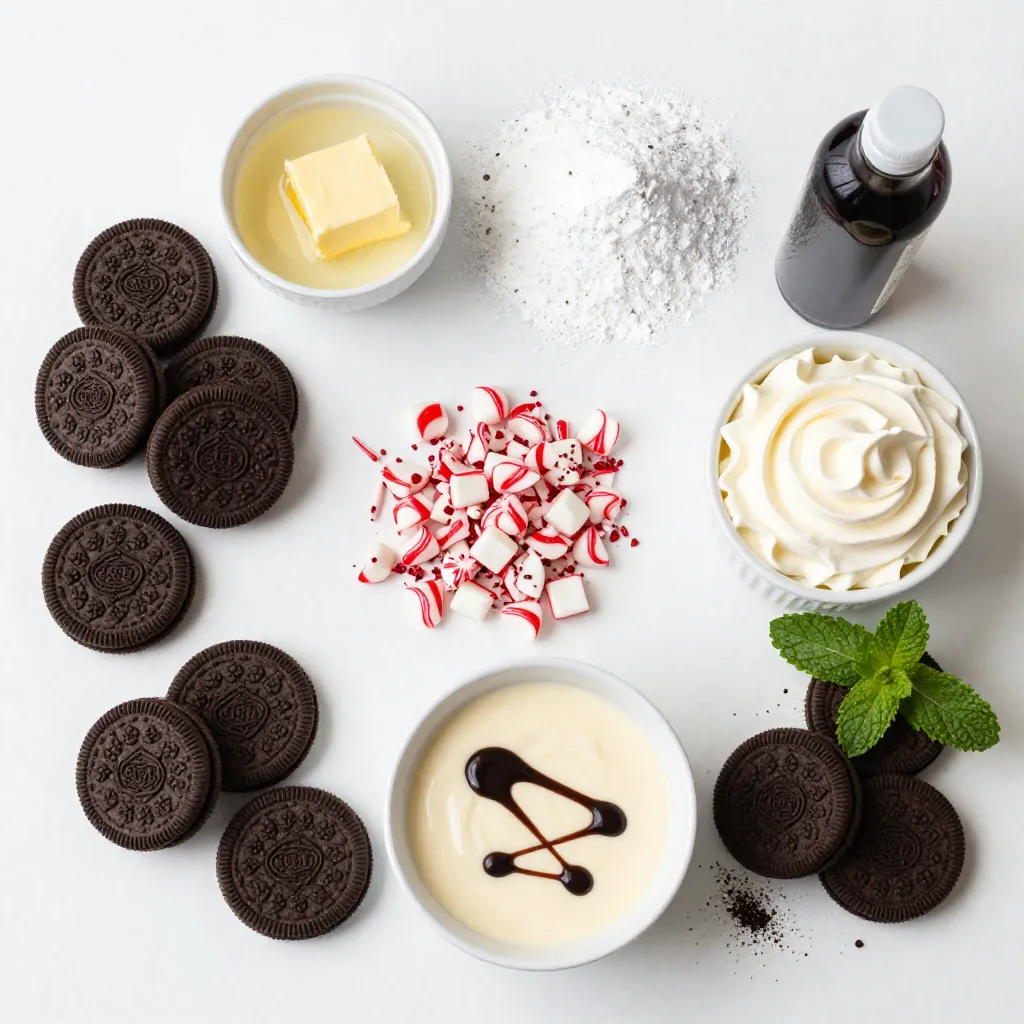
To make No-Bake Christmas Oreo Lasagna, gather these ingredients:
– 2 packages of Oreo cookies (single or double stuffed)
– ½ cup unsalted butter, melted
– 2 cups cream cheese, softened
– 1 cup powdered sugar
– 2 cups whipped topping (like Cool Whip)
– 1 teaspoon vanilla extract
– 1 cup peppermint candy canes, crushed
– 2 cups vanilla pudding mix (prepared with milk)
– ¼ cup chocolate syrup
– Additional crushed Oreos and mint leaves for garnish
These ingredients create layers of yummy flavors and textures. The Oreos provide a crunchy base, while the cream cheese adds a rich creaminess. The whipped topping makes it light, and the peppermint gives a fresh taste. Don’t forget to crush those candy canes for a festive touch!
Step-by-Step Instructions
Preparing the Oreo Crust
– First, take 1.5 packages of Oreo cookies.
– Crush the cookies in a food processor until they turn into fine crumbs.
– In a bowl, mix the crumbs with ½ cup melted butter.
– Stir well until you see a thick, moist mix.
– Next, press the mixture evenly into the bottom of a 9×13 inch dish.
– Place the dish in the fridge to set while you prepare the next layers.
Creating the Cream Cheese Layer
– In a medium bowl, whip 2 cups of softened cream cheese until smooth.
– Add 1 cup of powdered sugar and 1 teaspoon of vanilla extract.
– Mix until everything combines well.
– Gently fold in 2 cups of whipped topping.
– Make sure it stays light and fluffy.
Assembling the Layers
– Spread the cream cheese mixture evenly over the crust.
– Prepare 2 cups of vanilla pudding with milk as per the package directions.
– Once set, spread the pudding over the cream cheese layer.
– Sprinkle half of the crushed candy canes on top of the pudding.
– Finally, spread the remaining whipped topping over the pudding layer.
Finishing Touches
– Drizzle ¼ cup of chocolate syrup over the whipped topping.
– Add extra crushed Oreos and more candy canes for a festive look.
– Cover the dish with plastic wrap and chill for at least 4 hours.
– For best taste, let it chill overnight before serving.
Tips & Tricks
Perfecting the Layers
To get the best cream cheese layer, ensure the cream cheese is very soft. I suggest letting it sit out for 30 minutes before you start. This helps it mix better.
When making the pudding, follow the package instructions closely. Use cold milk for a smooth texture. Stir it well to avoid lumps. This makes every bite creamy.
Storage and Serving Suggestions
Chill your lasagna for at least four hours. If you can, let it sit overnight. This helps the flavors blend well. It’s best served cold.
For slicing, use a sharp knife. Dip it in warm water for clean cuts. This keeps the layers pretty and neat.
Decoration Ideas
To make your lasagna look festive, drizzle extra chocolate syrup on top. You can also add more crushed Oreos for a nice crunch.
Seasonal garnishes can make it pop. Try adding fresh mint leaves or small holiday sprinkles. You can even use red and green candies for a cheerful touch.
Pro Tips
- Use room temperature ingredients: Make sure your cream cheese is at room temperature for a smoother mixture that blends easily with the other ingredients.
- Chill for best flavor: Allow the lasagna to chill overnight for the flavors to meld together, resulting in a richer taste.
- Customize your toppings: Feel free to get creative with toppings! Consider adding mini chocolate chips or different kinds of crushed candies for a unique twist.
- Make it ahead of time: This dessert can be made a day or two in advance, making it a perfect choice for holiday gatherings.
Variations
Flavor Additions
You can have fun with flavors by using different Oreo cookies. Think about using mint, peanut butter, or even birthday cake Oreos. Each flavor adds a unique twist. If you want to skip peppermint candy canes, try crushed chocolate or toffee bits. You can also use sprinkles for a fun touch.
Dietary Adjustments
For gluten-free options, use gluten-free Oreo cookies. They taste just as good! If you need a dairy-free dessert, replace cream cheese with a dairy-free option. Use coconut cream or cashew cream instead. You can also choose a dairy-free whipped topping.
Themed Variations
This lasagna isn’t just for Christmas. You can tweak it for other holidays. For Halloween, add orange and black sprinkles. For birthdays, use colorful sprinkles and cake-flavored Oreos. You can make it festive for any event by changing the toppings. Just think about your theme and get creative!
Storage Info
Recommended Storage Practices
To keep your No-Bake Christmas Oreo Lasagna fresh, store it in the fridge. Place it in an airtight container. If you don’t have a container, cover it tightly with plastic wrap. This prevents drying out and keeps flavors intact.
How Long It Lasts
In the refrigerator, your lasagna stays good for about 3 to 5 days. If you want to freeze it, wrap individual slices well in plastic wrap. This way, you can enjoy it later. Frozen lasagna lasts up to 2 months. Just remember to thaw it in the fridge before serving.
Signs of Spoilage
Check for signs of spoilage before eating. If you see any mold or an off smell, it’s time to toss it. Also, if the texture feels slimy or grainy, that means it has gone bad. Always trust your senses to keep safe while enjoying this dessert.
FAQs
What is the prep time for No-Bake Christmas Oreo Lasagna?
The prep time for this dessert is about 30 minutes. You will need to gather your ingredients and prepare each layer.
Can I make this dessert ahead of time?
Yes, you can make this dessert ahead of time. It actually tastes better when it sits for a while.
How long should I chill the lasagna before serving?
You should chill the lasagna for at least 4 hours. For the best flavor, chill it overnight.
Can I use regular whipped cream instead of Cool Whip?
Yes, you can use regular whipped cream. Just make sure it is whipped to soft peaks.
Is it possible to make a smaller or larger portion?
Yes, you can adjust the recipe. Simply cut the ingredients in half for a smaller portion or double them for a larger one.
This blog post covered how to make a No-Bake Christmas Oreo Lasagna. We discussed the key ingredients, detailed step-by-step instructions, and provided tips for perfect layers. I shared helpful storage info and variations for all tastes.
In the end, this dessert is fun and easy to make. You can enjoy it during the holidays or at any gathering. With a bit of creativity, you can make it your own. Now, gather your ingredients and start creatin