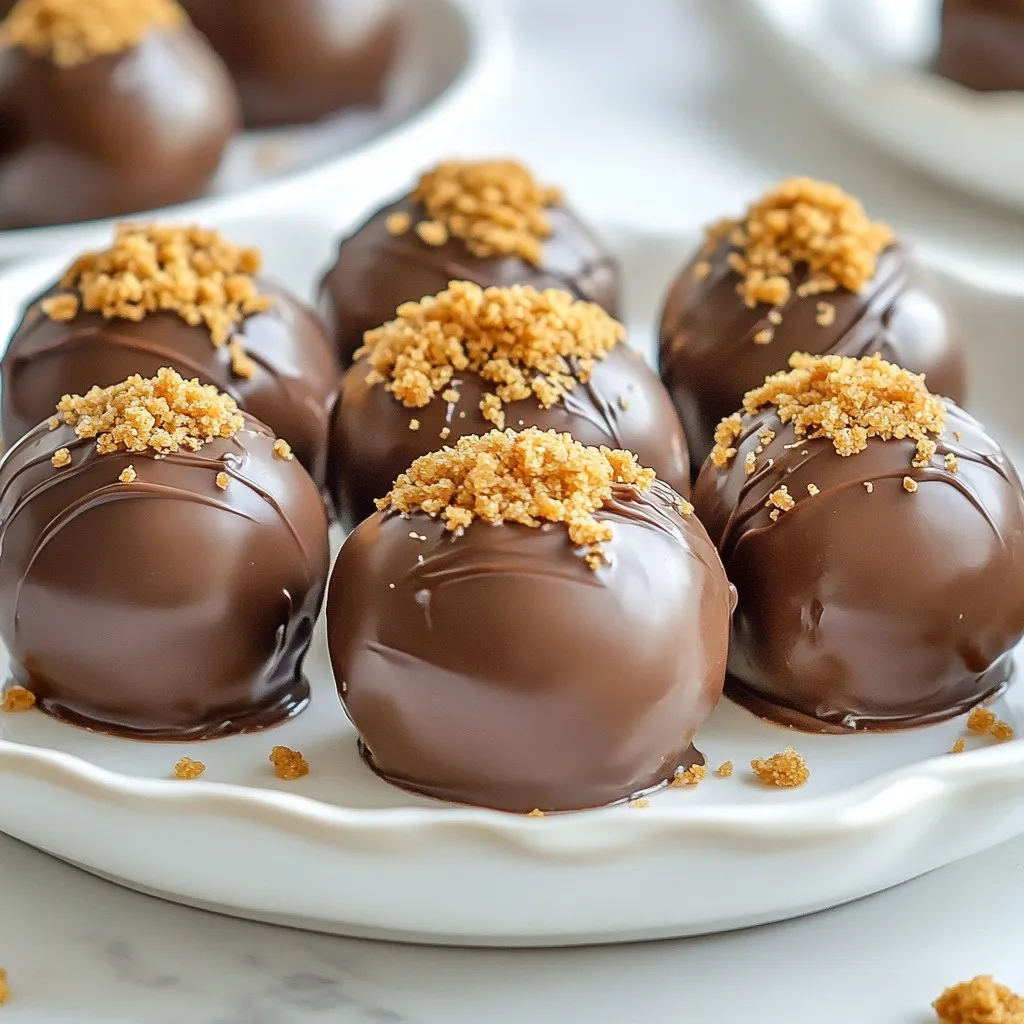
You won’t believe how easy it is to make No-Bake Butterfinger Balls. These sweet treats combine crushed Butterfinger bars, creamy peanut butter, and graham crackers for a delightful snack. In this post, I’ll guide you through simple steps to whip up these delicious bites without turning on your oven. Whether for parties, gifts, or a quick dessert, these treats will impress your friends and family! Are you ready to dive in?
Why I Love This Recipe
- Easy to Make: This no-bake recipe requires minimal effort and no oven, making it perfect for quick treats.
- Deliciously Sweet: The combination of Butterfinger and peanut butter creates a sweet and savory flavor that everyone loves.
- Great for Sharing: These bite-sized balls are perfect for parties, gatherings, or just sharing with friends and family.
- Customizable: You can easily modify the recipe by adding nuts, different types of chocolate, or other candy to suit your taste.
Ingredients
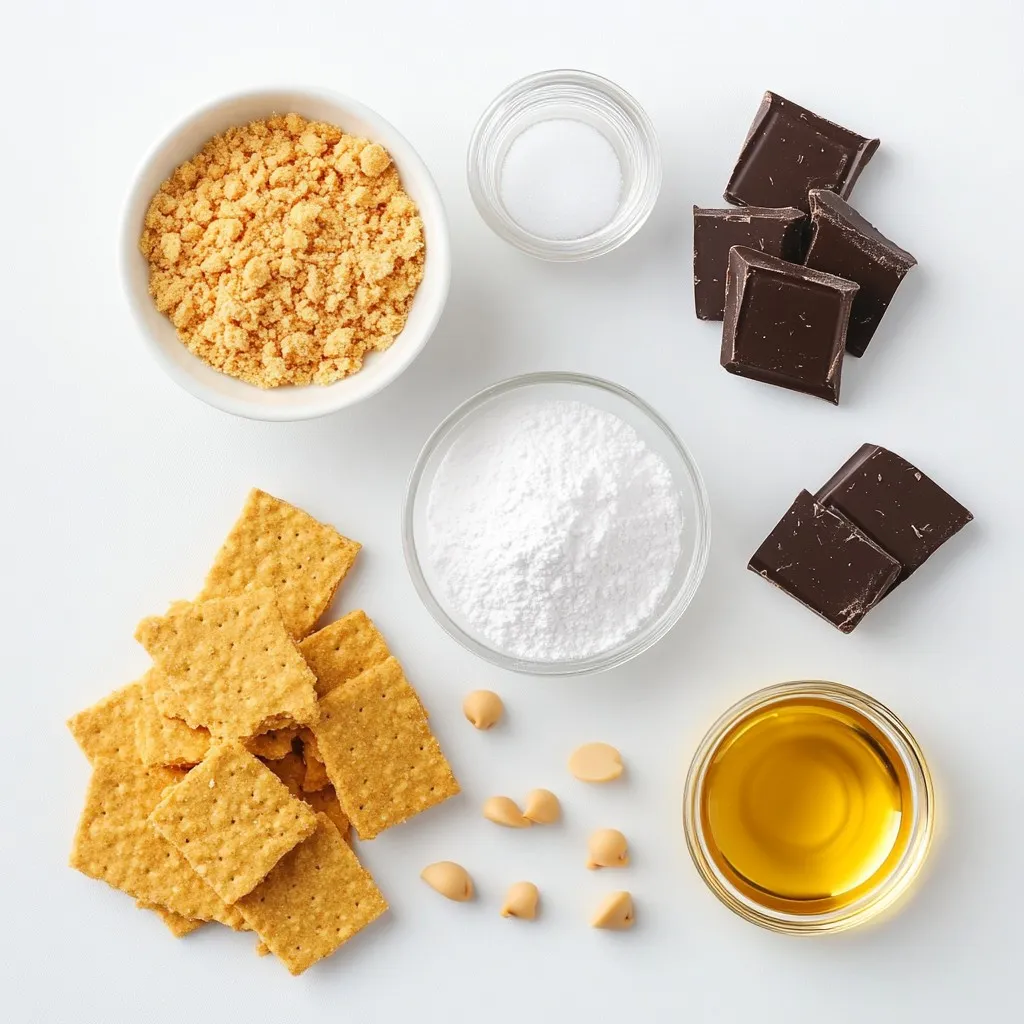
Main Ingredients Required
– 1 cup crushed Butterfinger candy bars
– 1 cup creamy peanut butter
– 2 cups crushed graham crackers
Additional Ingredients
– 1 cup powdered sugar
– 1 teaspoon vanilla extract
– 1 cup milk chocolate chips
– 1 tablespoon coconut oil (optional for melting)
Suggested Tools
– Large mixing bowl
– Microwave-safe bowl
– Parchment-lined baking sheet
To make No-Bake Butterfinger Balls, you need simple ingredients. The main stars are crushed Butterfinger candy bars, creamy peanut butter, and crushed graham crackers. These give the treats their classic flavor and texture.
For extra sweetness, add powdered sugar and a splash of vanilla extract. The chocolate coating comes from milk chocolate chips. If you want a smoother melt, you can use coconut oil.
You will also need basic tools. A large mixing bowl helps you combine the ingredients easily. A microwave-safe bowl is crucial for melting the chocolate. Don’t forget a parchment-lined baking sheet to keep the balls from sticking.
With these ingredients and tools, you’re ready to make a delightful treat.
Step-by-Step Instructions
How to Make the Dough
To start, take a large mixing bowl. Combine the crushed Butterfinger candy bars, creamy peanut butter, crushed graham crackers, powdered sugar, and vanilla extract. Use a spatula or your hands to mix all the ingredients well. You want to achieve a dough-like consistency. The mixture should hold together when you press it. If it feels too dry, add a bit more peanut butter.
Forming the Balls
Next, use your hands to shape the mixture into small balls. Aim for about 1 inch in diameter. This size makes for easy eating. Once shaped, place each ball on a parchment-lined baking sheet. Make sure they are spaced apart to avoid sticking.
Melting the Chocolate
Now it’s time for the chocolate. In a microwave-safe bowl, combine the milk chocolate chips and coconut oil, if you choose to use it. Heat this mixture in the microwave in 30-second intervals. Stir between each interval to ensure even melting. When the chocolate is smooth, it’s ready.
Dip each ball into the melted chocolate, making sure they get fully coated. Use a fork to lift them out. Lightly tap the fork on the edge of the bowl to remove any extra chocolate. Then, place the coated balls back on the parchment-lined sheet.
Tips & Tricks
Perfecting the Texture
To get the best texture, use room temperature peanut butter. It mixes well and makes the dough smooth. If you want a denser ball, adjust the amount of graham cracker crumbs. You can add more crumbs if the mix is too sticky. For a softer texture, use less.
Chocolate Coating Techniques
When dipping the balls in chocolate, a fork works best. Dip each ball fully, and then lift it out. Tap the fork gently on the bowl’s edge. This removes excess chocolate and keeps the coating even. If you find the chocolate too thick, add a little coconut oil to help it melt smoothly.
Garnishing Ideas
For a fun finish, sprinkle crushed Butterfinger on top. You can also use extra graham cracker crumbs for a nice crunch. If you want to mix things up, try using colorful sprinkles or chopped nuts. These options add a unique look and taste to your treats.
Pro Tips
- Chill Your Ingredients: For easier mixing and rolling, consider chilling your peanut butter and Butterfinger candy bars in the refrigerator for about 15 minutes before starting.
- Use a Cookie Scoop: To ensure uniformity and make rolling easier, use a cookie scoop to portion out the dough for each ball.
- Experiment with Chocolate: Try using dark chocolate or white chocolate for the coating to create different flavor profiles and visual appeal.
- Storage Tips: Store the finished Butterfinger balls in an airtight container in the refrigerator for up to a week for the best taste and texture.
Variations
Chocolate Alternatives
You can switch up the chocolate you use. Dark chocolate offers a rich taste. It pairs well with the sweet Butterfinger flavor. If you prefer something sweeter, go for milk chocolate. It’s classic and loved by many. White chocolate is another fun option. It adds a creamy and sweet touch. Each type changes the flavor a bit, so try them all!
Flavor Adjustments
To make your Butterfinger balls even more exciting, think about flavors. Adding cocoa powder gives a deeper chocolate taste. It’s a simple way to enhance the chocolate flavor. You can also mix in other candy bars. Snickers or Twix can add fun textures and tastes. Nuts like crushed almonds or peanuts add crunch. Experimenting with flavors keeps things fresh and fun!
Dietary Modifications
If you need to make your treat fit specific diets, there are great options. Use gluten-free graham crackers to keep it gluten-free. Many brands offer these, so it’s easy. For vegan eaters, substitute peanut butter with a nut-free option. Maple syrup can replace powdered sugar for a healthier twist. These changes make the treat suitable for everyone!
Storage Info
Best Storage Practices
To keep your No-Bake Butterfinger Balls fresh, store them in an airtight container. Place a layer of parchment paper between the layers of balls to prevent sticking. Keep the container in the refrigerator for best results. This helps maintain their flavor and texture. To stop the chocolate from melting, avoid placing them in warm areas. Always store them in a cool part of your fridge.
Freezing for Later
You can freeze Butterfinger Balls for longer storage. First, place them on a baking sheet in a single layer. Freeze them for about an hour until firm. After that, transfer them to a freezer-safe bag or container. Label the container with the date. To enjoy later, thaw them in the fridge overnight. This helps keep them tasting great and maintains their texture.
Shelf Life
In proper storage, these treats can last up to two weeks in the fridge. If you freeze them, they can stay good for about three months. Always check for signs of spoilage. Look for any off smells or changes in texture. If they look dry or crumbly, it’s best to toss them.
FAQs
Can I make No-Bake Butterfinger Balls ahead of time?
Yes, you can make these treats ahead of time. They store well in the fridge for up to a week. Just keep them in an airtight container. If you want to freeze them, place them in a freezer-safe container. They can last up to three months in the freezer. To enjoy, just let them thaw in the fridge overnight.
What can I substitute for Butterfinger?
If you don’t have Butterfinger, you can use other candy bars. Try Reese’s Peanut Butter Cups for a chocolate and peanut butter mix. You can also use Twix for a tasty caramel flavor. For a nutty twist, consider using Snickers. Each option will give a different taste, but they will still be delicious.
How do I make these gluten-free?
To make No-Bake Butterfinger Balls gluten-free, choose gluten-free graham crackers. Many brands offer these now. Be sure to check the labels. You can also use crushed gluten-free cookies or oats as a base. This way, everyone can enjoy these tasty treats without worry.
You now have all the steps to make delicious No-Bake Butterfinger Balls. Remember to use crushed Butterfinger, creamy peanut butter, and graham crackers as your base. Follow the tips for perfecting texture and chocolate coating.
Feel free to get creative with variations and storage. These treats can last and be enjoyed later. With easy prep, they’ll be a favorite for parties and snacks. Enjoy your tasty creation and share the joy of this simple recip