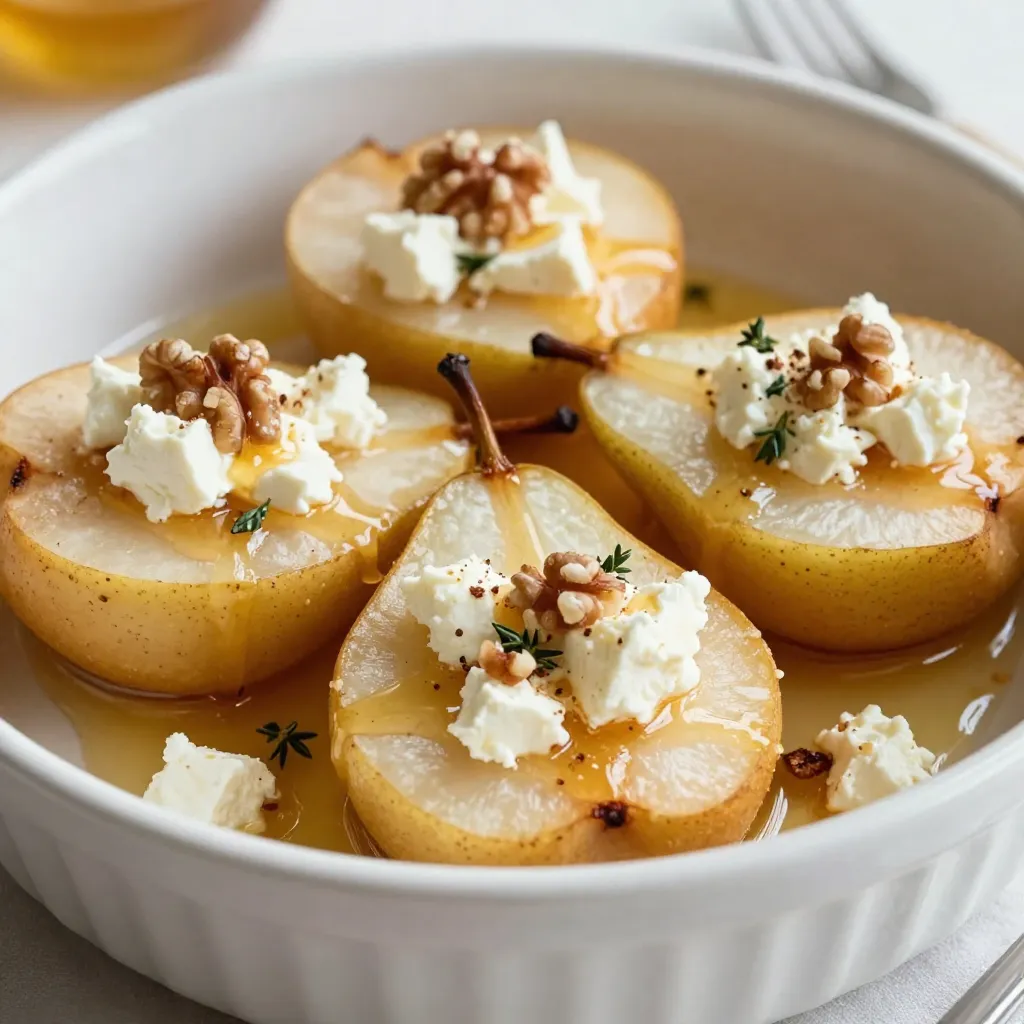
Are you ready to impress your friends and family with a simple yet elegant dessert? Honey Feta Baked Pears are the perfect treat for any occasion. With just a few ingredients, you can whip up a sweet and savory dish that delights the senses. This recipe combines creamy feta and sweet honey atop tender pears, creating a unique flavor that’s hard to resist. Let’s dive into this delightful recipe!
Why I Love This Recipe
- Deliciously Sweet and Savory: The combination of honey and feta provides a unique balance of flavors that is both sweet and savory, making each bite a delightful experience.
- Easy to Prepare: This recipe requires minimal preparation, making it perfect for both novice cooks and experienced chefs looking for a quick yet impressive dessert.
- Perfect for Any Occasion: Whether it’s a dinner party, holiday gathering, or a cozy night in, these baked pears are a versatile dish that fits any setting.
- Healthy Indulgence: With fresh pears, nuts, and feta, this dessert offers a healthier alternative to traditional sweets without sacrificing flavor.
Ingredients
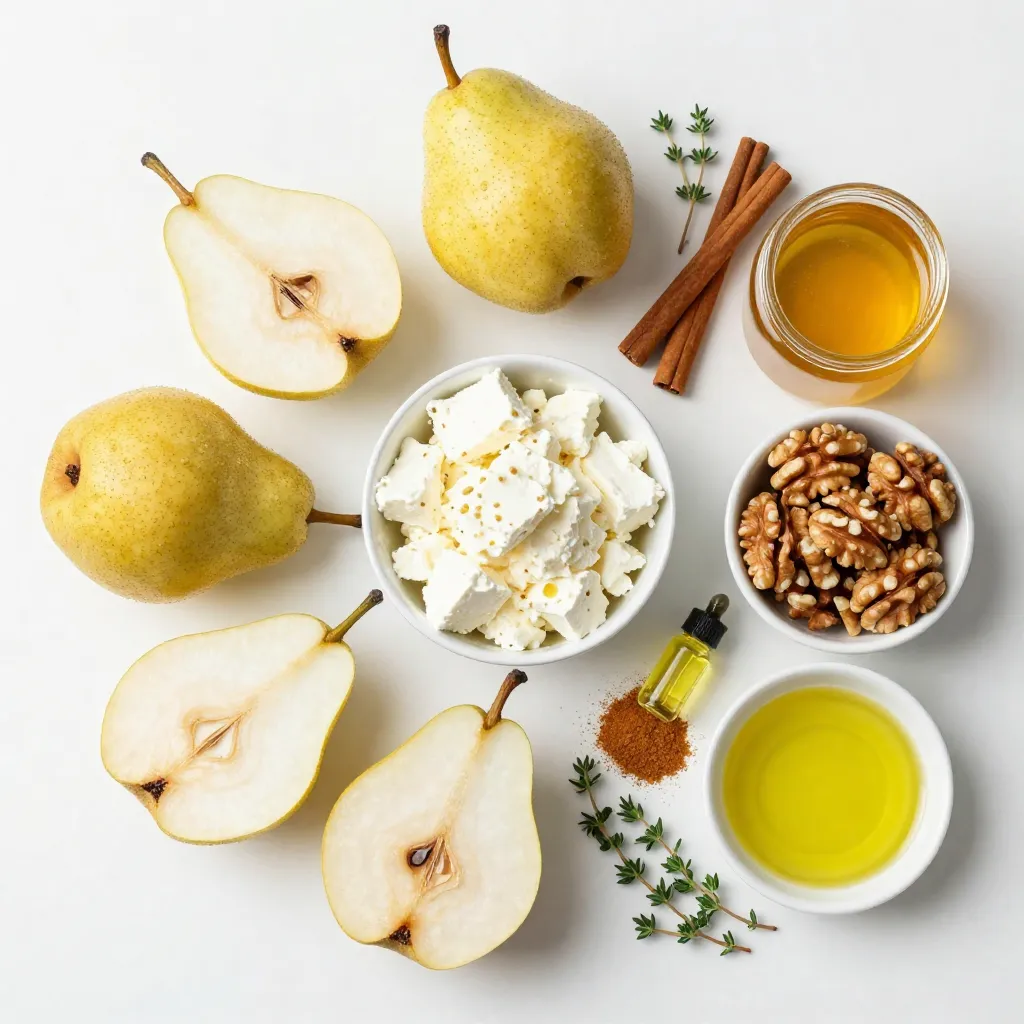
List of Ingredients
To make Honey Feta Baked Pears, you will need:
– 4 ripe pears, halved and cored
– 1 cup feta cheese, crumbled
– 1/2 cup walnuts, roughly chopped
– 1/4 cup honey
– 1 teaspoon cinnamon
– 1/2 teaspoon vanilla extract
– 2 tablespoons olive oil
Optional Garnishes
You can add fresh thyme leaves on top for a nice touch. They add color and flavor.
Suggested Pairing Ingredients
These baked pears pair well with vanilla ice cream or Greek yogurt. You can also serve them with a scoop of whipped cream for added sweetness.
Step-by-Step Instructions
Preheating and Preparation
Start by preheating your oven to 375°F (190°C). This step is key for even baking. While the oven heats, prepare your pears. Cut them in half and remove the core. This creates a nice space for the filling. Place the pear halves cut-side up in a baking dish.
Mixing the Filling
In a small bowl, combine the crumbled feta cheese, chopped walnuts, honey, cinnamon, and vanilla extract. Mix well until all the ingredients come together. The blend should be creamy and flavorful. This mixture will give the pears their sweet and salty taste.
Baking the Pears
Drizzle olive oil over the pear halves. Make sure each half gets a light coat. This keeps the pears moist while baking. Next, spoon the honey-feta mixture into the cavity of each pear half. Don’t be shy—load them up! Place the baking dish in the oven. Bake for 25-30 minutes. The pears should be tender, and the feta mixture should bubble and turn golden. Once baked, take them out and let them cool slightly. If you like, garnish with fresh thyme leaves for a touch of color.
Tips & Tricks
Choosing the Right Pears
Pick ripe pears for this recipe. Look for pears that yield slightly when pressed. Bartlett, Anjou, or Bosc pears work well. Their sweetness balances the salty feta. Avoid hard or overripe pears, as they may not bake well.
Perfecting the Feta Mixture
Use quality feta cheese for the best flavor. Crumble it well for smooth mixing. Combine it with walnuts for crunch, honey for sweetness, cinnamon for warmth, and vanilla for depth. Adjust the honey to your taste. You may want it sweeter or less sweet.
Baking Tips for Best Results
Preheat your oven to 375°F (190°C) before baking. This ensures even cooking. Arrange the pears cut-side up in a dish. Drizzle olive oil on them to keep them moist. Bake for 25-30 minutes. Check for tenderness, and look for a golden top on the feta mixture. Enjoy the warm, sweet aroma as they bake!
Pro Tips
- Choose the Right Pears: Opt for ripe but firm pears like Bosc or Anjou for the best texture and sweetness.
- Feta Cheese Variations: Experiment with different types of feta, such as herbed or smoked, to add unique flavors to your dish.
- Add a Crunch: For extra texture, consider adding some granola or crushed crackers on top of the feta mixture before baking.
- Serve Warm: These baked pears are best enjoyed warm, so serve them immediately after baking for the ultimate experience.
Variations
Different Nut Options
You can use different nuts in this dish. Almonds add a nice crunch. Pecans offer a sweeter taste. Cashews bring a creamy texture. Try mixing nuts for more flavor. Each nut changes the dish a bit. Experiment to find your favorite combination.
Using Other Cheeses
Feta is tasty, but other cheeses work too. Goat cheese is creamy and tangy. Cream cheese gives a rich flavor. Ricotta is light and airy. Each cheese adds a unique twist. Feel free to swap cheeses based on your taste.
Flavor Additions and Substitutions
You can add more flavors to the filling. A pinch of nutmeg gives warmth. Dried fruits like cranberries or raisins add sweetness. A splash of lemon juice brightens the taste. You could even use maple syrup instead of honey. These simple swaps can make your dish special.
Storage Info
How to Store Leftovers
To keep your Honey Feta Baked Pears fresh, let them cool completely. Place the pears in an airtight container. Store them in the fridge for up to three days. Make sure to cover them well to avoid drying out.
Reheating Instructions
When you’re ready to enjoy your leftovers, preheat your oven to 350°F (175°C). Place the pears on a baking sheet. Heat them for about 10-15 minutes until warm. You can also microwave them on low for about 1-2 minutes. Just be careful not to overheat, so the pears don’t get mushy.
Freezing Recommendations
If you want to freeze the baked pears, let them cool first. Wrap each pear half in plastic wrap. Then place them in a freezer-safe bag or container. They can last up to two months in the freezer. When you’re ready to eat, thaw them overnight in the fridge before reheating.
FAQs
Can I make Honey Feta Baked Pears in advance?
Yes, you can prepare Honey Feta Baked Pears ahead of time. You can mix the feta, walnuts, honey, cinnamon, and vanilla. Store this mixture in the fridge. Halve and core the pears just before baking to keep them fresh. When ready, assemble and bake as directed.
What can I serve with Honey Feta Baked Pears?
These baked pears shine with many pairings. You can serve them with vanilla ice cream or whipped cream for sweetness. A dollop of yogurt adds creaminess. Add some fresh berries on the side for a pop of color and flavor. You can also pair them with a glass of dessert wine.
Are there any vegan alternatives for this recipe?
Yes, you can make vegan Honey Feta Baked Pears. Swap feta cheese for a plant-based cheese. Use maple syrup instead of honey for a sweet touch. For the filling, try using chopped nuts and spices to add flavor. This keeps the dish delicious while meeting vegan needs.
You now have all the tools to make Honey Feta Baked Pears. We covered the key ingredients and optional garnishes to elevate your dish. You learned how to mix and bake for the best flavor. I shared tips for choosing pears and perfecting your feta blend. Plus, you explored variations for different tastes and storage methods.
Remember, this recipe is flexible. Feel free to get creative and make it your own. Enjoy your baking journe