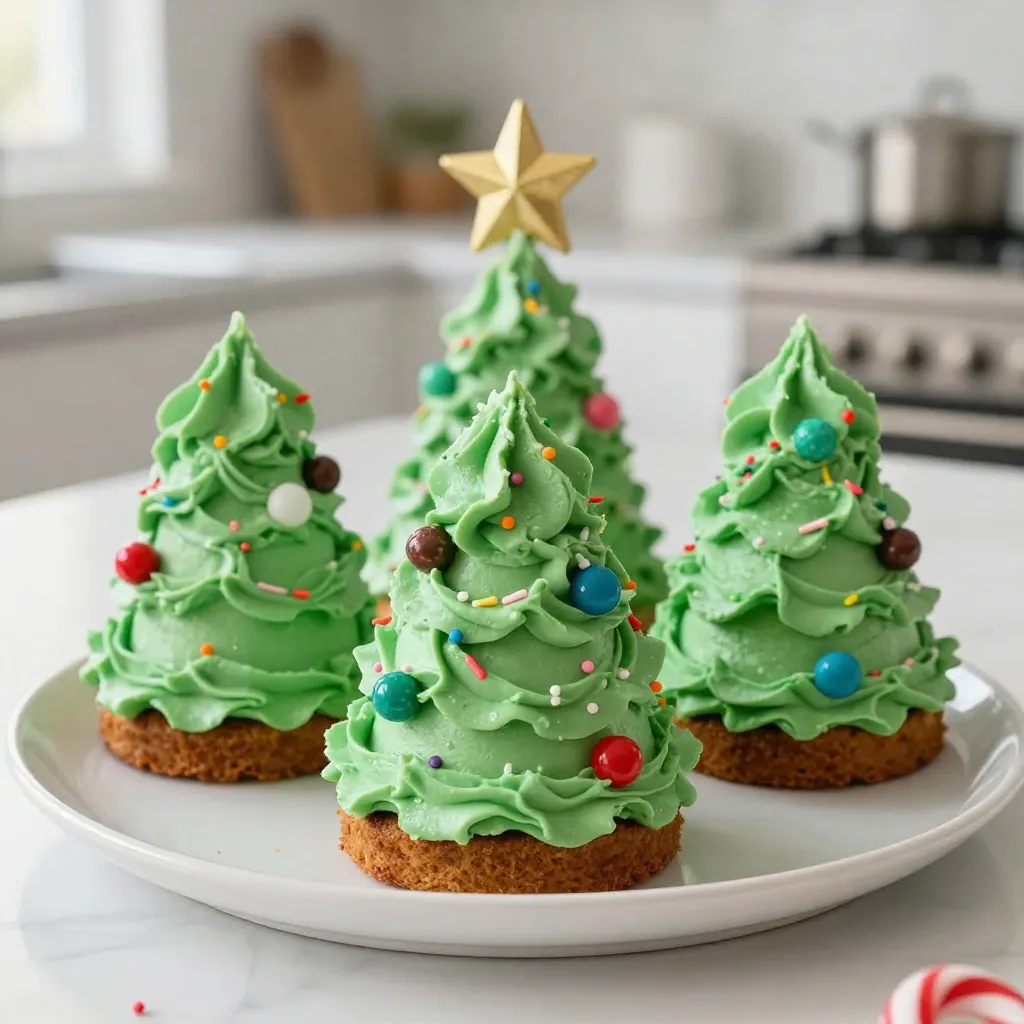
Get ready to impress this holiday season with a festive Christmas Tree Sheet Cake! This easy recipe combines simple ingredients and fun decorations, making it perfect for family gatherings and holiday parties. With every slice, you’ll bring smiles to faces of all ages. Follow along as I guide you through the steps to create this delightful treat and share tips to make your cake stand out this Christmas!
Why I Love This Recipe
- Festive Appearance: This cake looks like a beautiful Christmas tree, making it a perfect centerpiece for holiday gatherings.
- Easy to Make: With simple ingredients and straightforward steps, even novice bakers can create this delightful dessert.
- Customizable Flavors: You can easily adjust the flavorings or decorations to suit your family’s preferences and holiday spirit.
- Feeds a Crowd: This sheet cake is perfect for parties, yielding 20-24 pieces, ensuring everyone gets a slice of the festivity.
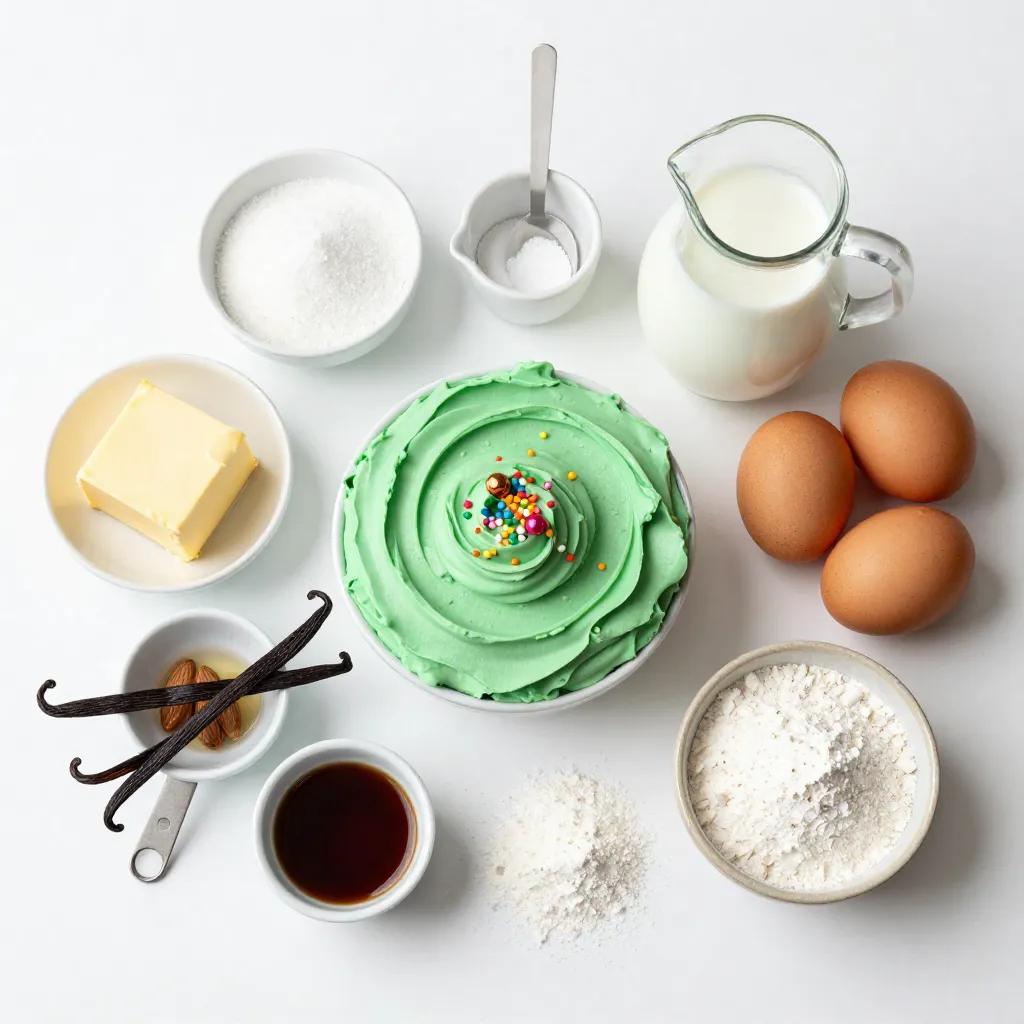
Ingredients
Main Cake Ingredients
– 2 cups all-purpose flour
– 1 ½ cups granulated sugar
– ½ cup unsalted butter, softened
– 1 cup whole milk
– 3 large eggs
– 2 teaspoons baking powder
– 1 teaspoon vanilla extract
– 1 teaspoon almond extract
– ½ teaspoon salt
– Green food coloring (approx. 1-2 teaspoons, to desired color)
Buttercream Frosting Ingredients
– 1 cup unsalted butter, softened
– 4 cups powdered sugar
– 2-4 tablespoons heavy cream or whole milk
– 1 teaspoon vanilla extract
– Green food coloring (as needed)
Decoration Supplies
– Edible decorations (sprinkles, mini ornaments, star toppers)
To make this Christmas Tree Sheet Cake, gather these ingredients first. I find it helps to lay everything out. The main cake uses simple items you likely already have. Flour, sugar, butter, and eggs create a soft base. The milk adds moisture, while baking powder helps it rise. Extracts bring rich flavor.
The buttercream frosting is just as easy. Softened butter and powdered sugar mix well. You can add heavy cream to adjust the texture. The green food coloring makes it festive.
Lastly, gather your decorations. Edible sprinkles and mini ornaments add fun. A star topper completes the tree look. With these ingredients, you’ll create a beautiful and tasty treat for the holidays!
Step-by-Step Instructions
Preparing the Cake Batter
1. Start by preheating your oven to 350°F (175°C). Grease a 13×18-inch baking sheet or line it with parchment paper. This makes cake removal easy.
2. In a large bowl, add ½ cup of softened butter and 1 ½ cups of granulated sugar. Using an electric mixer, beat them together until light and fluffy. This should take about 3-4 minutes.
3. Next, crack 3 large eggs into the bowl. Mix well after adding each egg. Then, add 1 teaspoon of vanilla extract and 1 teaspoon of almond extract. This adds great flavor.
Mixing Dry Ingredients
1. In another bowl, whisk together 2 cups of all-purpose flour, 2 teaspoons of baking powder, and ½ teaspoon of salt. This helps to blend the dry ingredients evenly.
2. Gradually add the dry mix to the wet batter. Alternate with 1 cup of whole milk. Start and end with the flour mix. This helps keep the batter smooth.
Baking the Cake
1. Now it’s time to add color! Mix in 1-2 teaspoons of green food coloring until you reach your desired shade.
2. Pour the batter into the prepared baking sheet. Smooth it out evenly across the pan. Bake for 25-30 minutes. Check doneness by inserting a toothpick into the center. It should come out clean.
Making the Buttercream Frosting
1. While the cake bakes, prepare the buttercream frosting. In a large bowl, beat 1 cup of softened butter until creamy.
2. Gradually add 4 cups of powdered sugar while mixing on low speed. This helps prevent a sugary cloud.
3. Then, add 2 tablespoons of heavy cream (or milk) and 1 teaspoon of vanilla extract. Add more green food coloring if needed. Beat on high until fluffy.
Decorating the Cake
1. Once the cake has cooled completely, use an offset spatula to spread the green buttercream frosting evenly over the top.
2. Get creative! Add edible decorations like sprinkles, mini candy ornaments, and a star on top. This makes your cake festive and fun.
Tips & Tricks
Baking Tips
– Ensuring the cake rises perfectly
Use fresh baking powder. Old baking powder can cause flat cakes. Make sure to beat the butter and sugar well until light and fluffy. This adds air for a better rise.
– Avoiding overmixing the batter
Mix just until the dry ingredients are combined. Overmixing can lead to a tough cake. Use a spatula to fold in the flour and milk gently.
Frosting Tips
– Achieving the perfect frosting consistency
Start with softened butter. Gradually add powdered sugar. If the frosting is too thick, add a little cream or milk. Aim for a creamy, spreadable texture.
– How to create a smooth finish
Use an offset spatula to spread the frosting. Dip it in warm water to help smooth out the surface. This gives your cake a polished look.
Decorating Techniques
– Creative ways to decorate the cake for a festive look
Slice the cake into triangles to mimic Christmas trees. Use green frosting to cover them. Add sprinkles or mini ornaments for a fun touch.
– Suggestions for arranging decorations effectively
Place larger decorations first, then fill in with smaller items. Create a scene with a star topper on the largest cake piece. This adds charm and interest.
Pro Tips
- Use Room Temperature Ingredients: Ensure your butter and eggs are at room temperature for better emulsification and a fluffier cake texture.
- Don’t Overmix the Batter: Mix until just combined to keep the cake light and airy. Overmixing can lead to a dense texture.
- Check for Doneness Early: Oven temperatures can vary, so check your cake a few minutes before the recommended baking time to prevent overbaking.
- Customize Your Decorations: Get creative with edible decorations! Use various sprinkles, candies, or even fresh fruits to make your cake festive and unique.
Variations
Flavor Variations
You can easily change the flavor of your Christmas Tree Sheet Cake. Start by switching your extracts. Instead of vanilla, try using peppermint extract for a minty twist. You can also add lemon zest for a bright, fresh taste.
To mix it up, add some cocoa powder to the batter. It gives a fun chocolate layer to your cake. For a spice kick, consider adding cinnamon or nutmeg. These flavors pair well with the holiday spirit.
Dietary Modifications
Want a gluten-free option? Substitute the all-purpose flour with a gluten-free blend. This works well and keeps the cake moist.
If you need a vegan cake, you can replace eggs with unsweetened applesauce. Use coconut oil instead of butter, and almond milk for the dairy. Both options keep your cake tasty and fluffy.
Themed Decoration Ideas
This cake is not just for Christmas. Make it fit any holiday! For Valentine’s Day, use pink and red frosting with heart sprinkles. For Halloween, use orange frosting and add candy pumpkins.
You can also create a birthday cake by using bright colors and fun decorations. Use colored frosting to match the party theme. This cake’s shape makes it a fun base for any celebration!
Storage Info
Storing the Cake
To keep your Christmas Tree Sheet Cake fresh, follow these steps:
– Wrap the cake: Use plastic wrap or aluminum foil to cover the cake well. This keeps it moist.
– Use an airtight container: If you have one, place the wrapped cake in an airtight container for extra protection.
– Store in the fridge: This cake lasts up to 4 days in the fridge.
– Freezing the cake: If you want to keep it longer, freeze it. It can last for up to 3 months in the freezer.
Reheating Instructions
If you want to enjoy the cake warm, here’s how to reheat it:
– Oven method: Preheat your oven to 350°F (175°C). Place slices on a baking sheet and heat for 10-15 minutes.
– Microwave method: For a quick option, microwave a slice for 10-15 seconds. This keeps it soft and moist.
– Serving suggestion: Serve with a scoop of vanilla ice cream or a drizzle of chocolate sauce for extra yum!
Making Ahead Tips
You can prepare the cake and frosting ahead of time:
– Bake the cake: Make the cake up to 2 days in advance. Wrap it tightly and store it in the fridge.
– Frost later: Prepare the frosting the day you want to serve it. This keeps it fresh and fluffy.
– Freezing options: If you want to freeze, bake the cake and wrap it well. Frost it after thawing for best results.
FAQs
What can I use instead of green food coloring?
You can use natural foods to color your cake. Spinach puree gives a nice green hue. You can also try matcha powder for a vibrant color. If you want a sweeter option, use pureed avocado. Each option adds a unique flavor to your cake.
How long can I keep the decorated cake?
The decorated cake lasts up to three days at room temperature. If you store it in the fridge, it stays fresh for about one week. An undecorated cake can last up to five days at room temperature if wrapped well.
Can I make this recipe using a different cake size or type?
Yes, you can adjust the recipe for different sizes. For smaller cakes, use a 9-inch round pan. Just reduce the baking time to about 20-25 minutes. You can also make this as a chocolate cake by adding cocoa powder to the flour mix.
How to prevent the cake from sticking to the pan?
To stop sticking, grease the pan well with butter. You can also dust it with flour after greasing. Using parchment paper makes it easy to lift the cake out. Just cut a piece to fit the pan before pouring in the batter.
What type of edible decorations work best?
For decorations, sprinkles are fun and colorful. Mini candy ornaments add a festive touch. You can also use chocolate stars for a classic look. Edible glitter makes your cake sparkle. Don’t forget to check for links to great decoration ideas online!
In this post, we explored how to make a delicious cake. You learned about the main ingredients, detailed steps, and helpful tips. We also discussed fun variations, storage options, and FAQs. Remember, baking is fun! You can experiment with flavors and decorations. Keep practicing your skills and enjoy the sweet results. With these tips, you’ll impress friends and family with your cake-making expertise. Happy bakin