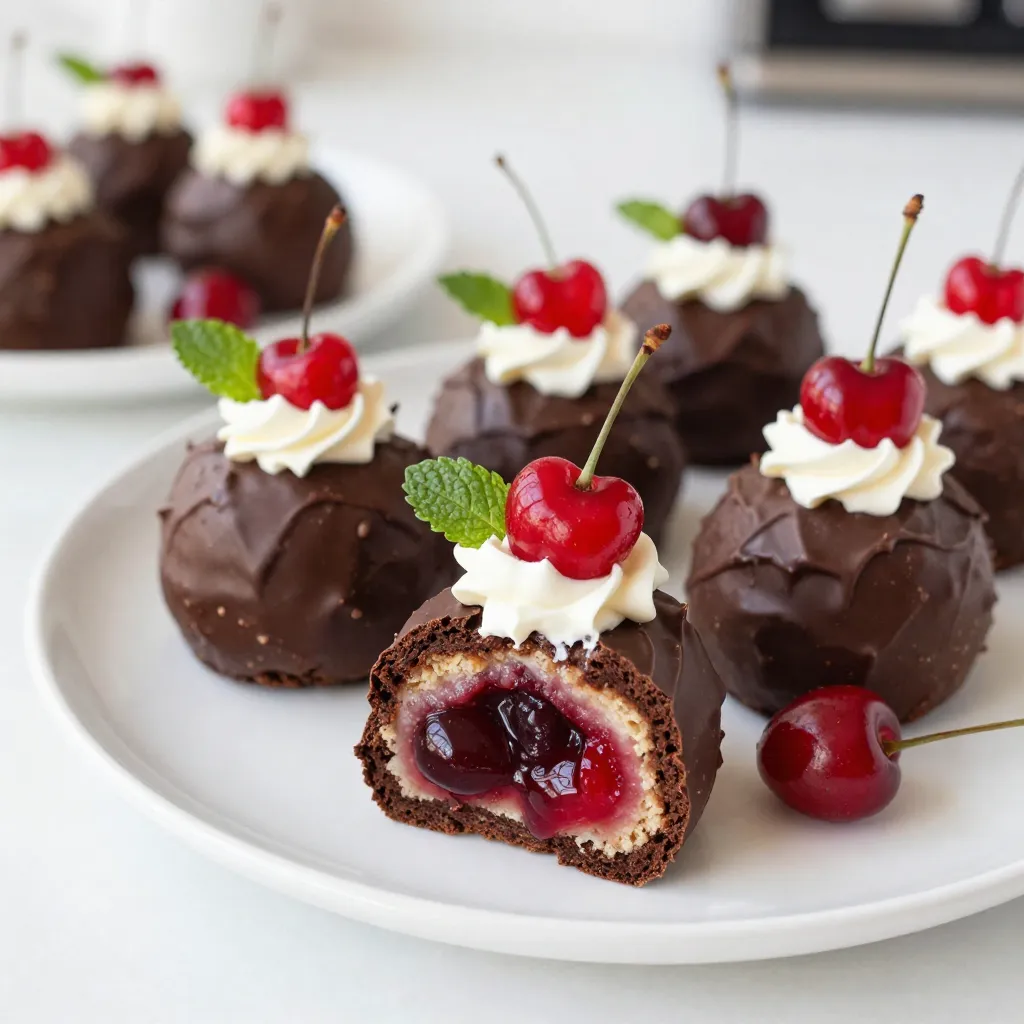
If you’re seeking a treat that combines rich chocolate with fruity delight, I’m excited to share my Black Forest Brownie Bombs recipe! These bite-sized desserts are packed with flavor and made with simple ingredients. You’ll love how easy they are to prepare and how satisfying they taste. Ready to impress your friends and family? Let’s dive into the sweet details and bring this delightful dessert to life!
Why I Love This Recipe
- Decadent Flavor: The combination of rich chocolate brownies and sweet cherry filling creates an indulgent treat that’s hard to resist.
- Easy to Make: This recipe uses a boxed brownie mix, making it quick and simple for bakers of all levels to enjoy a delicious dessert.
- Perfect for Sharing: These brownie bombs are bite-sized and great for parties, gatherings, or as a sweet gift for friends and family.
- Customizable: You can easily modify the recipe by adding different nuts or using various flavored pie fillings to suit your taste.
Ingredients
Main Ingredients
– 1 box of brownie mix
– 1 cup cherry pie filling
– 1 cup whipped cream cheese
Optional Ingredients
– ¼ cup chopped pecans or walnuts
– Fresh cherries and mint leaves for garnish
– ½ cup dark chocolate chips
Tools Needed
– Baking dish
– Mixing bowls
– Tray for freezing
I love using a box of brownie mix for this recipe. It saves time and still gives great flavor. You can find cherry pie filling in most grocery stores. This adds that classic Black Forest taste. Whipped cream cheese is key for a rich and creamy filling.
I sometimes add chopped nuts for crunch. They give a nice texture contrast. Fresh cherries and mint leaves make for beautiful garnishes. You can also use dark chocolate chips for extra chocolatey goodness.
To make these brownie bombs, you need some simple tools. A baking dish helps you prepare the brownies. Mixing bowls are great for combining ingredients. A tray for freezing helps shape the brownie bombs perfectly.
Gather all these ingredients and tools. You will be on your way to making a delightful dessert treat!

Step-by-Step Instructions
Preparing the Brownies
1. Preheat your oven as the brownie mix box says. Prepare your baking dish by greasing it or using parchment paper.
2. In a large bowl, mix the brownie mix with the required ingredients. This usually includes eggs, oil, and water. Stir until just combined.
3. Pour the brownie batter into your baking dish. Bake it according to the package instructions. A toothpick should come out with moist crumbs when done. Let the brownies cool completely.
Preparing the Filling
1. While the brownies cool, grab another bowl. Mix the whipped cream cheese, vanilla extract, and powdered sugar together until smooth.
2. Once the brownies are cool, crumble them into small pieces in a large bowl.
3. Gently mix in the cherry pie filling. Be careful not to mash the cherries.
Forming and Coating the Bombs
1. With your hands, shape the brownie mixture into small balls. Aim for about 1 inch in diameter. Press them firmly to keep them together.
2. Place the shaped brownie balls on a lined tray. Freeze them for about 30 minutes until they are firm.
3. While they freeze, melt the dark chocolate chips. You can use a microwave or a double boiler. Stir until smooth.
4. Take the brownie balls out of the freezer. Dip each ball into the melted chocolate, coating them fully. Return them to the tray.
5. For extra crunch, sprinkle some chopped nuts over the chocolate before it sets.
6. Refrigerate the dipped brownie bombs until the chocolate hardens, which takes about 15-20 minutes.
7. Serve chilled. Top each one with a dollop of whipped cream and a fresh cherry or mint leaf for a lovely touch.
Tips & Tricks
Baking Tips
– Ensuring brownie consistency: Use the right amount of eggs and oil as stated on the box. This keeps the brownies moist and fudgy. Check for doneness with a toothpick. It should have some moist crumbs but not wet batter.
– Proper mixing techniques: Mix the brownie batter just until combined. Overmixing can lead to tough brownies. Gently fold the ingredients to keep a light texture.
Chocolate Dipping Tips
– Achieving smooth chocolate coating: Melt dark chocolate slowly to avoid burning. Use a microwave or double boiler. Stir it well until it’s creamy and glossy. This makes for a beautiful finish.
– Adding toppings: After dipping, sprinkle chopped nuts on the chocolate before it sets. This adds a crunchy layer to your brownie bombs. You can also use sprinkles or coconut for fun variations.
Serving Suggestions
– Best practices for presentation: Place the brownie bombs on a decorative plate. Add a dollop of whipped cream and a fresh cherry on top. A mint leaf adds a nice touch of color.
– Ideal serving temperature: Serve the brownie bombs chilled. This keeps the chocolate firm and the filling cool. Enjoy them straight from the fridge for the best flavor experience.
Pro Tips
- Use Quality Ingredients: The better the chocolate and cherries, the richer and more flavorful your brownie bombs will be. Opt for high-quality dark chocolate and fresh or premium cherry pie filling for the best results.
- Chill the Mixture: After mixing the brownie and cherry filling, chilling the mixture before forming balls makes it easier to handle and helps them maintain their shape.
- Double Dip for Extra Decadence: For a thicker chocolate coating, dip the brownie bombs twice in melted chocolate, allowing them to set between dips for an indulgent treat.
- Customize Your Toppings: Feel free to get creative with toppings! Consider adding crushed Oreos, sprinkles, or even a drizzle of white chocolate for a unique twist.
Variations
Flavor Variations
You can change the flavor of your Black Forest Brownie Bombs easily. Try using different fruit fillings. For example, raspberry or strawberry pie filling works well. These fruits add a fresh twist to the classic taste. You can also mix in nuts. Instead of pecans or walnuts, use almonds or hazelnuts. Each nut gives a unique crunch and flavor.
Dietary Modifications
If you need gluten-free options, look for a gluten-free brownie mix. Many brands offer tasty choices that work great. You can also make this recipe dairy-free. Use non-dairy cream cheese for the filling. Brands like Tofutti or Kite Hill provide great alternatives. This way, everyone can enjoy these treats!
Presentation Variations
How you present your brownie bombs can make a big difference. For special occasions, drizzle melted chocolate over them. This adds a nice touch and makes them look fancy. You can also sprinkle some colorful sprinkles on top. For garnishes, fresh cherries and mint leaves work well. They add a pop of color and freshness to each bite.
Storage Info
Storing Brownie Bombs
To keep your Black Forest Brownie Bombs fresh, store them in an airtight container. This helps to keep moisture out and flavor in. You can place a layer of parchment paper between layers to avoid sticking. For best results, refrigerate them if you plan to eat them within a week.
If you want to store them longer, freezing is a great option. Place the brownie bombs on a tray and freeze them for about 30 minutes until they are firm. Then, transfer them to a freezer-safe container. This way, they won’t stick together.
Shelf Life
In the fridge, your brownie bombs will last about 5 to 7 days. If you freeze them, they can last up to 3 months. To check for spoilage, look for any changes in color or texture. If they smell off or have mold, it’s best to discard them.
Reheating Instructions
To serve leftovers, let them sit at room temperature for about 10 minutes. This helps to bring back some of their soft texture. If you want them warm, you can microwave each bomb for about 10-15 seconds. Just be careful not to overheat them, or they might get too soft.
FAQs
What are Black Forest Brownie Bombs?
Black Forest Brownie Bombs are a fun twist on the classic Black Forest cake. They blend rich brownie with sweet cherry filling and creamy cheese. I love how these bites capture the same great flavors in a small, easy-to-eat form. The chocolate coating and cherry on top make them look fancy too. They are perfect for parties or just a sweet treat at home.
Can I make these ahead of time?
Yes, you can make these bombs ahead of time. I suggest making them up to two days in advance. After you coat them in chocolate, store them in the fridge. This keeps them fresh and tasty. If you want to make them even earlier, freeze them before coating in chocolate. Just thaw them in the fridge before you dip them.
Where can I buy Black Forest Brownie Bombs?
You can find Black Forest Brownie Bombs at some local bakeries or dessert shops. If you prefer online shopping, check out sites like Etsy or specialty dessert shops. Many places offer delivery for these tasty treats. You could also ask your favorite bakery to make them for you.
In this post, we explored how to make Black Forest Brownie Bombs. You learned the key ingredients, including brownie mix and cherry pie filling. We walked through easy steps for preparation and tips for perfecting your dessert. Remember, you can customize these treats with different flavors or dietary options. Store them properly to enjoy later. These brownie bombs are not only fun to make but also perfect for sharing. Now you’re ready to impress with this tasty trea